Exploring Jekyll Basics via a Blog
In this section we set up a Jekyll blog on GitHub Pages to learn about _config.yml, YML front matter, and Posts.
Set Up Your Project Repository
First, create a new repository for your example blog:
- On GitHub, click the “+” plus icon in the upper right of the nav bar.
- Select “New repository”.
- Fill in “Create a new repository” page:
- “Repository name”, since this will be your new example blog and be part of the URL, think a bit about what you want to call it. Use all lowercase, no spaces, and no weird characters. Dash (
-) or underscore (_) are okay. - Check the “Add a README file” option.
- “Repository name”, since this will be your new example blog and be part of the URL, think a bit about what you want to call it. Use all lowercase, no spaces, and no weird characters. Dash (
- Finally, click the green “Create repository” button.
Second, activate GitHub Pages:
- Click the “Settings” tab.
- Scroll down to the “GitHub Pages” section.
- Under “Source”, use the dropdown to select “main” branch and leave folder as “/ (root)”.
- Click “Save”.
Configure Site
The first step to starting a Jekyll project is to create _config.yml, which will contain site wide configuration options, variables, and settings.
For example, config values such as title will be used to populate template elements throughout your final web site.
YAML is a plain text data format (using extension .yml) designed to be fairly easy to write and read, yet still provide advanced data structures similar to XML or JSON.
It is used in Jekyll for configuration, page front matter, and site data.
Most options will be key-value pairs, looking something like:
example_key: example value
Note: YAML ignores blank lines, requires spaces instead of tabs, and uses indentation to represent nesting–so take care creating the files following the syntax.
Create _config.yml
- On your repository’s home page, click the “Add file” button and select “Create new file”.
- Type in the name for your file:
_config.yml(be sure to include the underscore!) - Put your cursor in the editor and create your config following the example below.
- When done editing, scroll to the bottom of the page to the “Commit changes” section.
- Fill in your “commit message” and click the green “Commit changes” button.
# Site settings
title: Great New Blog Title
author:
  name: Evan Will
  email: your-email@domain.com
description: "Great site about Jekyll on GH-Pages."

# Build settings
remote_theme: jekyll/minima
A few notes about the YAML in the example above:
- Comments are denoted by a hash (
#), everything following the hash on a line will be ignored. - Blank lines are ignored, so use them to organize your file and make it easier to read.
titleis an example of a simple key-value pair. It is optional to put quotes around the value (unless it contains a colon or multiple lines)authoris an example of a nested value, with two childrennameandemailnested by indenting two spaces.- The variables included in the example are based on options the Minima (v.3) theme supports–they could be different depending on the theme or project you are creating. Documentation for each theme should tell you what variables can be used to customize the template.
Note: using a theme is optional and definitely not necessary!
Jekyll themes provide a handy starting point so you can focus on content creation, but a pre-made theme is not required.
You can build out the framework of your site however you want.
In this example we set the remote_theme to the official Jekyll theme Minima.
Following the pattern remote_theme: username/repositoryname allows you to use any theme that is hosted in a GitHub repository (browse options).
However, the remote_theme setting is specific to GitHub Pages.
Normally, Jekyll uses the config option theme to select themes that are available as Ruby Gems (“gem-based themes”).
GitHub Pages has only a few supported themes using this method.
When using Jekyll locally, the gem-based theme set in config will be installed (using bundle install), downloading a copy of the theme and storing it with your Ruby Gems.
In theory, this leaves your project folder clean so you can tweak a few customization options and just focus on content creation.
In practice, because gem-based themes are essentially hidden, extensive customization can be confusing.
If you are doing a lot of tweaking or want to create your own theme it may be simpler to include the theme files directly in your project repository.
In that case do NOT include a theme/remote_theme setting in _config.yml.
(Personally, I very rarely use a theme!)
Home Page
With the basics of our site set in _config.yml, next we will need a home page.
For every page in the site, we need to create a content stub in Markdown or HTML with YAML Front Matter. During build, Jekyll will process all files with YAML front matter (even if its empty), rendering the Markdown and wrapping the content in the theme to generate the final HTML page. Any files without front matter will be copied to the site without processing.
YAML front matter is denoted by three dashes on a line (---), followed by some YAML (optional), and closed by three more dashes on a line.
For example:
---
# a comment
example_key: example value
---
The YAML front matter will not appear as part of the content, unless it is pulled in by the theme.
For example, themes often set the page’s header based on the title value given in the front matter.
It is often necessary to set a layout to use custom templates for different types of pages.
Create index.md
- On your repository’s home page, click the “Add file” button and select “Create new file”.
- Type in the name for your file:
index.md - Put your cursor in the editor and create your home page following the example below. Note that Minima has a special
homelayout that will automatically add content feeds. Thus the only front matter necessary islayout. Follow by some very basic Markdown content, since the home page will already feature a feed of your blog posts. - When done editing, scroll to the bottom of the page to the “Commit changes” section.
- Fill in your “commit message” and click the green “Commit changes” button.
---
layout: home
---

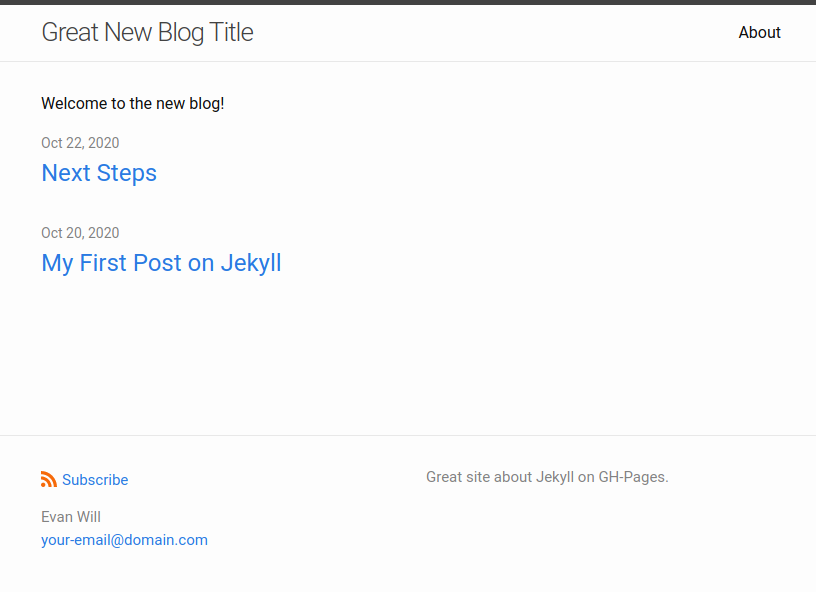
Welcome to my new blog!
With this commit the new blog should be live! Look for the green check next to your commit history, then surf to the URL following the pattern:
https://username.github.io/repositoryname/
Write Posts
Blogs are made up of Posts…
and Jekyll has the concept built in to its default structure.
Markdown stubs created in the _posts folder will flesh out your content and can be accessed in layouts by date, tag, and category.
Each post must be given a filename following the pattern:
yyyy-mm-dd-title.md
For example, “2020-10-31-happy-halloween.md” or “1990-01-01-first-day-of-www.md”.
Create _posts
- On your repository’s home page, click the “Add file” button and select “Create new file”.
- Start by typing
_postsfollowed by/. Adding the slash will automatically let GitHub know you want to create a new folder (“_posts”). - Continue typing your post filename:
2020-10-20-first-post.md - Put your cursor in the editor to add the front matter and Markdown content, following the example below.
- When done editing, scroll to the bottom of the page to the “Commit changes” section, fill in your “commit message” and click the green “Commit changes” button.
---
layout: post
title: My First Jekyll Post
tags: first markdown example
categories: demo
---

This is a paragraph in my first post.
Show off your Markdown!

## Heading Two

Any text with no empty lines between will become a paragraph.
Leave an blank line between headings and paragraphs.
Font can be *Italic* or **Bold**.
Code can be highlighted with `backticks`.

Hyperlinks look like this [GitHub Help](https://help.github.com/).

A bullet list is created using `*`, `+`, or `-`, like:

- dog
- cat
- muffin

A numbered list is created using a number + `.`, like:

1. one
2. two
6. three
2. four
Keep Posting, More Markdown
- On your repository’s home page, click the “Add file” button and select “Create new file”.
- Continue typing your post filename:
_posts/2020-10-22-second-post.md - Put your cursor in the editor to add the front matter and content, following the example below to learn some more Markdown syntax.
- When done editing, scroll to the bottom of the page to the “Commit changes” section, fill in your “commit message” and click the green “Commit changes” button.
---
layout: post
title: Next Steps
tags: second markdown example
categories: demo
---
This is a paragraph in my second post.
In Markdown, adding an image looks similar to a link.

I found this [Cat image on Wikimedia](https://commons.wikimedia.org/wiki/File:VAN_CAT.png).
Horizontal rule:
--------------
> A block quote.
> Is like this.
A table:
| header | column a | column b |
| --- | --- | --- |
| dogs | 3 | 6 |
| cats | 3 | 6 |
| muffins | 15 | 30 |
Posts, Collections, & Pages
Of course not every website is a blog.
The _posts directory is completely optional.
Posts are optimized to simplify writing blog-like content with features like date, title, and categories built into the filename convention.
Collections provide another flexible option for creating groups of content that can be sorted and iterated over using built in methods (Posts are in fact a specialized, built in Collection).
However, many sites will use only Pages for content.
We have already created index.md, so let’s create the other essential, an About page.
Create about.md
- On your repository’s home page, click the “Add file” button and select “Create new file”.
- Type in the name for your file:
about.md - Create your about with front matter and Markdown following the example below.
- Fill in your “commit message” and click the green “Commit changes” button.
---
layout: page
title: About
---

Some Markdown content describing your site.

## About About Pages

The About page is a common convention found on websites.
It is your opportunity to let us know all the details "about" your project:

- focus and topic area
- people involved
- code and projects used
Be sure to check out what your blog looks like with all this new content!
