Basic Git Workflow
In general, the basic Git routine is:
git cloneto copy a repository to your local machine orgit pullto update your local copy of the repository.- Edit the repository files locally…
git add…git commit…git push…- Repeat!
Workflow Sketch
Spoiler: We are going to repeat the pattern above over and over! We will refer back to this sketch to try to make sense of the basic commands as we walk through.
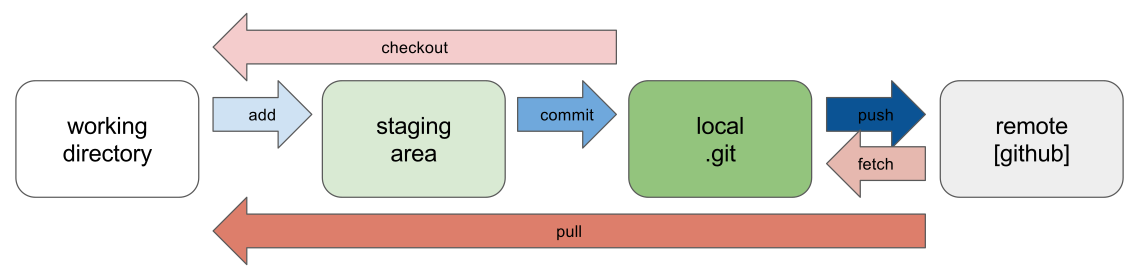
Always remember: Git has good built in help, so add --help to the end of any command to learn more.
git clone
To download a copy of a repository from GitHub, use git clone:
- Go to the test GitHub repository you created during the last section.
- Click the green “Code” button, and copy the Clone URL from the dropdown.
- In your terminal, navigate to your desired location (or right click on a folder and select “Git bash here” / “Terminal here”. I suggest keeping organized in a folder named “github” in your Documents directory.
- In your terminal, type
git cloneand paste in your URL (right click orshift+Ctrl+V).
For example:
git clone https://github.com/uidaholib/git-example.git
Clone will download a full copy of the repository to your local machine and record its origin on GitHub.
This ensures there is a configured connection between the local copy and the “remote” on GitHub so you can push your changes to GitHub or fetch updates.
Your cloned repo is simply a folder of files, with a hidden .git directory that stores the full history.
The .git folder is hidden for a reason–you don’t need to know anything about it and should never touch it!
The rest of the directory is the same as any other folder on your computer.
You can edit, create, delete, or move files just as you normally would–but now Git is watching!
git status
Git status is your friend. Type it often!
git status
Create a new file in your repository using a text editor, or the command line:
echo "some interesting notes" > notes.txt
Then check the status again!
git add
Once you have made changes in your repository, you need to tell Git to start tracking the file.
The function git add adds the files to the “staging area”, meaning Git is now tracking the changes.
git add notes.txt
git status
Files can be added individually by name, or use the flag git add -A to stage all currently changed files at once.
Only the changes to files in the “staging area” will be saved in the next commit.
git commit
We changed a file, we added it to the staging area, and now we are ready to take a snapshot storing away these changes forever.
Let’s commit!
Each commit records the state of the full repository along with the timestamp, user name, email, and message of the committer.
A message is required! It is your note to posterity so you can remember why you made changes in the future (for style tips, see The Art of the Commit).
git commit -m "add notes file"
git status
We have stored away a new version of the documents in the repository and will be able to navigate this history. Typically, it is better to make many smaller focused commits, rather than big ones, since small changes will be easier to undo, review, and merge.
The -m flag adds the message on the command line.
If you forget the message, Git will open your default text editor and wait for you to enter and save a message.
Repeat!
You will use add, commit, and status over and over!
Git add fills the staging area.
Git commit takes the snapshot of changes in the staging area.
Edit the files in your test repository and repeat the routine.
git add notes.txt
git commit -m "more notes"
git status
Important notes:
- Use
addto group changed files that you want to commit together. You do not need to add all changes before making a commit, only the ones you want to capture together. Group them based on one theme, what this commit is aiming to do in the repository, what task does it complete. This helps keep your history organized and comprehensible (vs. a jumble of unrelated changes grouped together). commitis NOT related to saving a file on your computer. When you are editing a file and save it, Git does not automatically record the change. Also if you have unsaved files, Git does not know about those changes. Just keep in mind that Git is watching the folder of files, but is not directly tied to the tools you use to edit, manage, and manipulate them.
git push
Notice that git status now says “your branch is ahead of origin/main”.
Origin/main is the standard way to name the primary branch of the remote repository.
We finished our changes to the repository locally, but for now all these great new commits are only stored in the local version of our repository.
Next, we want to add them to the remote hosted on GitHub using push.
git push origin main
Push sends only the changes, so it is very efficient network use.
Using origin main specifies which branch we want to push to in the remote repository.
However, in most cases the command can be shortened to just git push.
Once you have a successful push, refresh your repository home page on GitHub to see the new commits!
Authentication
The first time you try to push you will probably need to setup authentication on GitHub.
On Windows and Mac this is usually pretty seamless and will automatically pop up a web browser to sign in and authorize your computer to push.
Check the authentication notes on the setup page for more information.
git pull
In this demo we started with git clone to make a copy of our repository from GitHub on our local machine.
Once you already have the repository on your computer, you will still need to keep it up-to-date from the remote.
To do that, we use the command git pull.
Try this example:
- On your repository on GitHub, make a new commit using the web editor. You will now have history on the remote that is not in your local repository.
- In your terminal in your local repository try
git status. Notice that the local does not know about the new changes. - In your terminal type
git pull
Depending on your workflow, you may want to git fetch rather than pull.
The command git fetch updates repository from remote, but does not change the local files–while git pull is short for fetch + merge, thus will update from the remote and combine that new information with your local work, updating the files on your computer.
It is important to pull or fetch before you start working locally! You want to have the most up-to-date version of the history on your computer to avoid confusing merges (and general frustration).
Review
git status

git pull

git add file.txt

git commit -m "message"

git push