Using Branches and Forks
Branching is a Git fundamental that allows you to test out ideas in parallel to your main repository without disrupting the main copy.
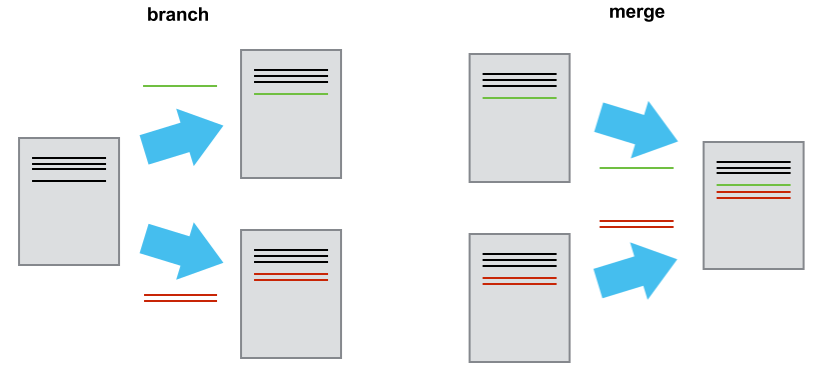
A branch is an exact copy of the repository that starts off with its own independent history (without needing to actually copy all the files). In a new branch, you can experiment, debug, or wildly modify your repository–all while your main branch is safely tucked away by Git. If this exploration is a dead end, the branch can be painlessly deleted–or if it solves all your problems, it can merged back into the main!
git branch
The git branch command overlaps with checkout (which is honestly rather confusing).
First, you create a new branch using branch, but second you need to switch to that branch to actually use it, using checkout.
Walk through this demo:
git branch example-1creates a new branch–however, our working directory is still using themainbranch!git branch --listlists all our our branches. The current branch is marked with an*asterisk.git checkout example-1switches the working directory to using the “example-1” branch. Any changes committed will now be in a new history tied only this this branch and will not be reflected in the “main” branch.- Edit some files,
addandcommitin your new branch. git checkout mainswitches the working directory back to the “main” branch. The changes you just created in the files will disappear!git checkout -b another-branchusing the flag-bis a short cut to create a new branch and check it out at the same time.git branch -D example-1use the flag-Dwill permanently delete a branch.
Since branches are simply based on adding new commits to a new chain of history, they are very efficient and don’t add extra size to your repository. Use them to help keep your development organized and safe!
git merge
Once you have branches, you may want to merge them back together, combining the history of the two branches into one.
Luckily, Git has tools to automate merging. If it encounters a line that can not be automatically merged, Git will mark the file for you to manually fix before proceeding. For details, check the Git Book Basic Branching and Merging or GitHub resolve merge conflicts.
First, create a new branch and add some new commits:
git checkout -b new-branch
echo "new stuff" > newfile.txt
git add newfile.txt
git commit -m "new stuff"
Second, switch back the the main branch, then merge the “new-branch” into main:
git checkout main
git merge new-branch
Keep in mind that a merge is a new set of changes, thus triggers a commit and required message!
Finally, you can clean up using git branch -D new-branch since that history is now part of main.
Remote branches
In this demo so far we have created branches in our local repository.
It is a bit confusing that branches are only local by default, e.g. when you git checkout -b example on your laptop, the new “example” branch is only on your machine and will not automatically be pushed to GitHub.
Likewise, a new branch available on GitHub will not automatically appear on your local machine when you use “git branch” to list branches.
A branch that is connected to a remote repository (GitHub) is called a “tracking branch”.
When you clone a new repository from GitHub, the “main” branch is automatically set up as a “tracking branch”.
If other branches exist on the GitHub repository, Git knows about them, but doesn’t not automatically create them locally.
To checkout a remote branch:
- To list all branches, both local and remote, use
git branch -a. - To checkout a remote branch to create a local version to work on, use
git checkout branch-name(when there is no local branch with that name already and it exactly matches a remote branch, Git will automatically create the local “tracking branch”). Now with the branch there locally, you can push and fetch/pull/push as normal.
To push a new local branch to the remote:
- Create and switch to a new branch,
git checkout -b branch-name. - To add the branch to the remote,
git push -u origin branch-namewill create the remote branch and set the “upstream” for the local version. Once you run that command once, the “tracking branch” will be set, so going forward you can just usegit pushandgit pull.
Keep in mind that if you git pull in one branch, it does not update other branches in your local repository!
If you are working on multiple remote branches with updates, you will have to do a fresh git pull when you check out a branch.
Having your branches available in the remote is usually good practice and can aid collaboration. Rather than merging branches on your local machine, you can use GitHub’s “Pull Request” feature to more formally complete the merge, allowing for a more visual process and discussion with your collaborators.
Branch Workflows
Using branches strategically figures into many collaboration workflows, such as Github flow.
Often, the main branch is considered functioning, production ready code. Additional branches are created to develop and test new features. When the new features are ready, the development branch can be merged into the main using a Pull Request to keep track of the work.
Even on small, personal projects, using branches for all development can be an excellent approach to protect the history of your main branch and keep organized.
For an overview of workflows that might help your team collaborate, check BitBucket’s Git Workflow Tutorial.
GitHub Fork and Pull Request
“Fork” is a GitHub feature (not part of Git), designed for a workflow similar to using git branches to collaborate with people who do not have direct access to a repository (fork docs).
Clicking the fork button on a repository creates a “fork” in your account–a full copy of the repository code and history with a link configured back to the original, with the same name as the original. It is intended to be used to contribute changes back to the original via Pull Requests, thus the “fork” repository will not have the full features of normal repositories.
You can add branches and commits to your fork just like any other repository. Once your changes are ready, much like merging a branch, you can ask the owners of the original repository to pull in your commits using a “Pull Request”.
Understanding how to fork and create a PR will allow you to contribute to open source or manage a centralized project for your team. Check the Forking Projects guide for an demo example, or the BitBucket PR tutorial.
Many projects will have a contributing guide, details are often listed in a file named CONTRIBUTING, to help you understand how they handle PRs or Issues.
For more information, check the How to Contribute to Open Source guide.